
The Ultimate Guide to DNS in Azure – Master Your Cloud Infrastructure Now!
If you’re using Azure, DNS management is a crucial aspect of your overall infrastructure management. In this article, we’ll explore what DNS in Azure is, why it’s important in Azure, and how you can implement it to optimize your applications and services.
What is DNS?
DNS (Domain Name System) is a distributed naming system used to translate human-readable domain names into IP addresses that computers can understand. It’s essentially a phonebook for the internet that helps you connect to the right web server when you type in a URL.
There are different types of DNS records that serve different purposes. Here are some of the most common types of DNS records:
- A Record – Also known as Address Record, it maps a domain name to the corresponding IP address. This is the most fundamental DNS record type.
- MX Record – MX stands for Mail Exchange. This record type specifies the mail server responsible for accepting email messages on behalf of a domain.
- CNAME Record – CNAME stands for Canonical Name. It maps an alias or nickname for a domain name to its actual (canonical) name. This is often used for subdomains or creating aliases for popular websites.
- TXT Record – Text record is used to store arbitrary non-formatted text data. It can be used for various purposes, such as verifying domain ownership, storing SPF (Sender Policy Framework) information for email authentication, and more.
- NS Record – NS stands for Name Server. It specifies the authoritative DNS server for a domain name.
- PTR Record – PTR stands for Pointer Record. It maps an IP address to a domain name. This is used for reverse DNS lookup, which resolves an IP address to its corresponding domain name.
- SRV Record – SRV stands for Service Record. It specifies the location of a service provided by a domain name, such as a SIP server for voice-over-IP (VoIP) calls.
These are some of the most common DNS record types, but there are others as well, such as AAAA (IPv6 address) record, SOA (Start of Authority) record, and more.
Explain SOA Record with example.
A Start of Authority (SOA) record is a DNS resource record that provides administrative information about a DNS zone. It contains information about the primary authoritative DNS server for the zone and other parameters that control the behavior of DNS resolution for the zone.
Here is an example of an SOA record:
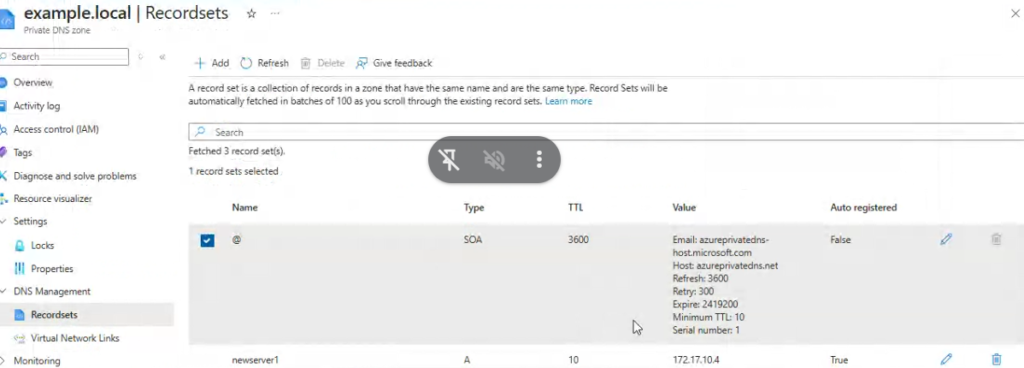
Sample DNS SOA Records
In this example, the SOA record for the domain “example.com” includes the following information:
- Primary name server: “ns1.example.com” is the primary authoritative DNS server for the zone.
- Email address of the responsible person: “admin.example.com” is the email address of the person responsible for the zone.
- Serial number: “2021032501” is the current version number for the zone. This number is typically incremented each time changes are made to the zone.
- Refresh time: “3600” (1 hour) is the time interval after which secondary DNS servers should query the primary DNS server for changes to the zone.
- Retry time: “900” (15 minutes) is the time interval after which secondary DNS servers should retry querying the primary DNS server if they fail to get a response.
- Expire time: “1209600” (2 weeks) is the time interval after which secondary DNS servers should stop serving the zone if they are unable to contact the primary DNS server.
- Minimum TTL: “86400” (1 day) is the minimum time-to-live value for all resource records in the zone.
Why is DNS important in Azure?
In Azure, DNS plays a crucial role in enabling communication between virtual machines, cloud services, and other resources. It also helps to optimize application performance by routing traffic to the nearest available server and balancing the workload across multiple servers.
What is DNS Zones in Azure?
A DNS zone is a container for DNS records that specify the mapping between domain names and IP addresses. In Azure, you can create DNS zones to manage the DNS records for your domain names. You can either create a new DNS zone or import an existing one from your DNS provider.
What is the difference between Public and Private DNS Zone in Azure?
In Azure, a DNS zone is a container for DNS records that define how domain names are resolved to IP addresses. Azure supports two types of DNS zones: public and private.
Public DNS Zone: A public DNS zone is used to manage domain names that can be accessed from the internet. Public DNS zones are typically used to manage domain names for public-facing web applications, email servers, or other services that need to be accessed from the internet. The public DNS zone is managed by the Azure DNS service and can be accessed by anyone on the internet.
Private DNS Zone: A private DNS zone is used to manage domain names that are not accessible from the internet. Private DNS zones are typically used to manage domain names for resources that are hosted within a private network or virtual network. Private DNS zones are managed within the scope of the virtual network and can only be accessed by resources within that network. This provides an additional layer of security and isolation for private resources.
The main difference between public and private DNS zones is the accessibility of the domain names they manage. Public DNS zones are accessible from the internet, while private DNS zones are only accessible within a private network or virtual network. Additionally, public DNS zones are managed by the Azure DNS service, while private DNS zones are managed within the scope of the virtual network.
Creating a DNS Zone in Azure
To create a new DNS zone in Azure, follow these steps:
- Go to the Azure Portal and sign in to your account.
- Click on “Create a resource” and search for “DNS zone”.
- Select “DNS zone” from the search results and click on “Create”.
- Enter a name for the DNS zone and select the subscription and resource group you want to use.
- Choose the pricing tier for the DNS zone based on your needs.
- Click on “Create” to create the DNS zone.
Managing DNS Records in Azure
Once you’ve created a DNS zone in Azure, you can add DNS records to it to map your domain names to IP addresses. Here’s how you can manage DNS records in Azure:
- Go to the Azure Portal and select your DNS zone.
- Click on “Add record set” to add a new DNS record.
- Enter the name and type of the DNS record, and specify the IP address or FQDN (Fully Qualified Domain Name) it should map to.
- Click on “Create” to create the DNS record.
DNS Resolution in Azure
DNS resolution is the process of resolving domain names to IP addresses. In Azure, DNS resolution is done using the Azure-provided DNS service or your own DNS servers. Here’s how you can configure DNS resolution in Azure:
Using Azure-provided DNS Service
By default, all Azure VMs are configured to use the Azure-provided DNS service for name resolution. This service automatically resolves the domain names of Azure resources to their respective IP addresses. You can configure your VMs to use your own DNS servers for name resolution if needed.
Using Your Own DNS Servers
If you want to use your own DNS servers for name resolution in Azure, you can do so by configuring your VMs to use your DNS servers. Here’s how you can configure DNS servers for your VMs:
- Go to the Azure Portal and select your VM.
- Click on “Networking” and select “DNS servers”.
- Enter the IP address of your DNS server and click on “Save”.
DNS Security in Azure
DNS security is a crucial aspect of DNS management in Azure. Here are some best practices you should follow to secure your DNS infrastructure:
- Use DNSSEC
DNSSEC (Domain Name System Security Extensions) is a set of security protocols used to protect the DNS infrastructure from attacks like DNS cache poisoning and DNS spoofing. You can enable DNSSEC for your DNS zones in Azure to secure your DNS infrastructure.
- Use Azure DNS Private Zones
Azure DNS Private Zones allows you to create private DNS zones that are only accessible within your virtual network. This helps to enhance the security of your DNS infrastructure by preventing unauthorized access from outside your network.
- Use Network Security Groups (NSGs)
Network Security Groups (NSGs) allow you to control network traffic to and from your virtual machines. By configuring NSGs, you can restrict access to your DNS servers and prevent unauthorized access from the internet.
DNS Traffic Routing in Azure
DNS traffic routing is the process of directing incoming traffic to the appropriate server based on the requestor’s location or other factors. In Azure, you can use Traffic Manager to route DNS traffic to your resources based on the following routing methods:
Priority
With the priority routing method, you can specify a primary endpoint and one or more secondary endpoints. Traffic is directed to the primary endpoint, and if it’s unavailable, traffic is redirected to the secondary endpoints.
Weighted
With the weighted routing method, you can distribute traffic across multiple endpoints based on their relative weights. This allows you to balance the workload across multiple servers and optimize application performance.
Performance
With the performance routing method, Traffic Manager directs traffic to the endpoint that provides the best latency and network performance for the requestor’s location.
FAQs
- What is DNS resolution, and why is it important in Azure?
DNS resolution is the process of converting a domain name to an IP address. It’s important in Azure because it enables virtual machines and other resources to communicate with each other using human-readable domain names instead of IP addresses. This makes it easier to manage and scale your infrastructure.
- How can I configure DNS servers for my virtual machines in Azure?
You can configure DNS servers for your virtual machines in Azure by either using Azure DNS or by deploying your own DNS servers. If you choose to use Azure DNS, you can create private DNS zones that are only accessible within your virtual network. If you deploy your own DNS servers, you can use virtual network peering to connect them to your virtual network.
- What are the best practices for securing my DNS infrastructure in Azure?
The best practices for securing your DNS infrastructure in Azure include using private DNS zones, securing your DNS servers with NSGs, and using RBAC to control access to your DNS resources. Additionally, you should regularly monitor your DNS logs and configure alerts to notify you of any suspicious activity.
- Can I use Traffic Manager to route traffic to resources in different regions?
Yes, you can use Traffic Manager to route traffic to resources in different regions. Traffic Manager supports routing methods based on geographic location, endpoint health, and performance. This allows you to optimize the performance and availability of your applications and services.
- How do I troubleshoot DNS issues in Azure?
To troubleshoot DNS issues in Azure, you can use tools like NSLookup and Dig to test DNS resolution. You should also check the DNS server logs for any errors or warnings. If you’re still unable to resolve the issue, you can open a support ticket with Microsoft for further assistance.
Conclusion
DNS management is an essential aspect of infrastructure management in Azure. By understanding DNS zones, resolution, security, and traffic routing in Azure, you can optimize the performance and security of your applications and services. By following the best practices outlined in this article, you can ensure that your DNS infrastructure is secure, scalable, and efficient.
