Azure Vnet Peering and Private EndPoints FAQs
Interview Preparation Questions and Answers for Azure Vnet Peering Connection.

What is Azure peering, and how does it work?
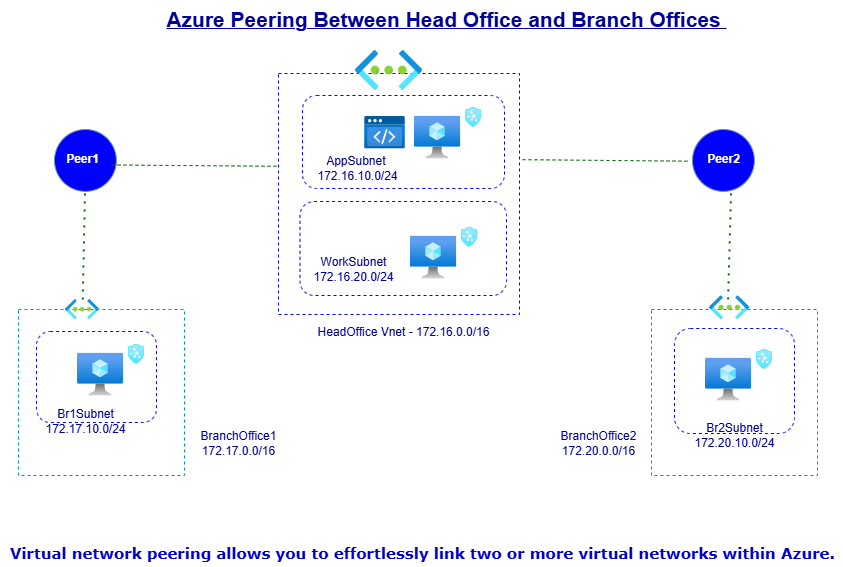
Azure peering is a service that allows customers to connect their on-premises network with Azure virtual networks. It establishes a direct, private connection between the two networks, enabling data to flow securely between them. This can be done using two types of peering: VNet peering, which connects virtual networks within Azure, and ExpressRoute peering, which connects Azure to an on-premises network.
What are the benefits of using Azure peering?
Azure Virtual Network (VNet) Peering is a powerful feature that enables direct, seamless communication between two or more Azure VNets. Below are the technical benefits of using Azure VNet peering, highlighting its functionality and practical applications.
1. Seamless and Private Connectivity
- VNet peering allows virtual networks to communicate directly over Azure’s private backbone infrastructure, bypassing the public internet.
- Traffic remains private and secure as it does not traverse external networks or require encryption by default.
2. High Bandwidth and Low Latency
- The connection between peered VNets is based on Azure’s high-performance backbone, providing intra-region latency in the range of 1–3 milliseconds.
- Bandwidth is constrained only by the resources in your subscription, with no hard bandwidth limit imposed by the peering connection itself.
3. Cross-Region Connectivity (Global VNet Peering)
- Supports cross-region VNet peering, enabling direct communication between VNets in different Azure regions.
- While there is a nominal cost for global peering traffic, it offers significant latency improvements compared to VPN or ExpressRoute-based inter-region connections.
4. Simplified Network Architecture
- Hub-and-Spoke Topology: VNet peering simplifies architectures by enabling multiple spoke VNets to connect to a central hub VNet for resource sharing or centralized services like firewalls, DNS, or monitoring.
- Reduces reliance on Azure VPN Gateways or complex UDR configurations for connectivity.
5. Cost-Effective Solution
- VNet peering removes the need for gateway deployments or public IP communication, reducing overall infrastructure costs.
- Peering Pricing:
- Intra-region Peering: Charges only for ingress/egress data between VNets.
- Global Peering: Additional costs apply for inter-region traffic, but it is significantly cheaper than traditional WAN solutions.
6. Full Network Feature Compatibility
- VNet peering works seamlessly with other Azure network features:
- Network Security Groups (NSGs): Control inbound and outbound traffic at subnet or NIC level.
- User-Defined Routes (UDRs): Support custom routing to direct traffic flows as needed.
- Azure Load Balancers: Share load-balanced resources across peered VNets.
- Each VNet retains its autonomous control over its own NSGs and UDRs.
7. Resource Sharing and Communication
- Resources in one VNet (e.g., Virtual Machines, App Services, Azure SQL Databases) can be accessed from another peered VNet without exposing them to the internet.
- Supports multi-tier applications distributed across different VNets (e.g., web layer in VNet-1, database layer in VNet-2).
8. No Bandwidth Bottleneck
- Traffic flows over Azure’s backbone network without passing through the Azure WAN edge.
- Removes dependency on VPN or ExpressRoute gateways, which may introduce throughput limitations.
9. Overlapping IP Address Ranges Not Allowed
- Requires non-overlapping IP address spaces for VNets. This ensures unambiguous routing of packets between peered VNets.
- Before peering, you must carefully plan the IP address range (CIDR blocks) for each VNet.
10. Cross-Subscription and Cross-Tenant Peering
- Peering supports VNets in different Azure subscriptions as long as both subscriptions are linked to the same Azure Active Directory (AAD) tenant.
- Cross-tenant peering is also possible but requires manual authorization via resource IDs.
11. Built-In Security
- Traffic between VNets is unencrypted but private by default, leveraging Azure’s backbone.
- Optionally, Azure Firewall or NSGs can enforce further traffic filtering or inspection.
12. Peering Limitations
- Each VNet can have a maximum of 500 peering connections.
- Does not support transitive routing by default. For example:
- If VNet-A is peered with VNet-B and VNet-B is peered with VNet-C, VNet-A cannot communicate with VNet-C unless explicitly peered.
13. Flexible Routing Options
- Supports custom UDRs to direct traffic between VNets or through on-premises networks.
- Enables forced tunneling to direct traffic to on-premises systems or centralized security appliances.
Use Cases:
-
Hub-and-Spoke Architecture:
- Central hub VNet for shared services like firewalls, DNS, or VPN gateways, with spokes for individual workloads or regions.
-
Multi-Region Deployment:
- Seamless communication between global offices or datacenters without requiring a physical network overlay.
-
Multi-Tier Applications:
- Split application tiers (e.g., web, app, database) across multiple VNets for scalability and security.
-
Centralized Security and Monitoring:
- Use a hub VNet to monitor and filter traffic for all connected VNets.
What is a private endpoint in Azure?
A private endpoint is a network interface that connects a virtual network to an Azure service that supports private endpoints. It provides a secure and private connection to the service, eliminating the need for public IP addresses or access over the internet. Private endpoints can be created for several Azure services, including Azure Storage, Azure SQL Database, and Azure Kubernetes Service.
How does a private endpoint work?
When a private endpoint is created, it is assigned an IP address within the virtual network. The Azure service is then configured to listen on that IP address, so that any traffic sent to it is routed through the private endpoint. This creates a secure and private connection between the virtual network and the Azure service, without the need for public IP addresses or access over the internet.
What are the benefits of using private endpoints in Azure?
Private endpoints provide several benefits, including improved security, reduced network exposure, and simplified network architecture. By eliminating the need for public IP addresses or access over the internet, they provide a more secure and private connection to Azure services. They also reduce network exposure, as traffic is limited to a specific IP address, and simplify network architecture by reducing the number of external endpoints.
How do I create a private endpoint in Azure?
To create a private endpoint in Azure, you first need to select the Azure service that you want to connect to. Then, you need to create a subnet within your virtual network that will be used to host the private endpoint. Finally, you need to configure the Azure service to use the private endpoint, and then create the endpoint itself.
Can I use Azure peering and private endpoints together?
Yes, you can use Azure peering and private endpoints together to create a more secure and private network architecture. By using Azure peering to connect your on-premises network with Azure virtual networks, and then using private endpoints to connect to Azure services, you can create a highly secure and private network architecture.
How do I troubleshoot issues with Azure peering or private endpoints?
If you are experiencing issues with Azure peering or private endpoints, you can use Azure Monitor to monitor network traffic and identify potential issues. You can also use the Azure Network Watcher to diagnose connectivity issues and troubleshoot network problems.
Are there any additional costs associated with using Azure peering or private endpoints?
Yes, there may be additional costs associated with using Azure peering or private endpoints, depending on your usage. For example, there may be data transfer costs associated with using Azure peering, and there may be additional charges for creating and using private endpoints.
Creating Vnet Peering Conection in Azure Portal Within Vnets with Azure Powershell.
To create a peering between two virtual networks (VNets) using Azure PowerShell, follow the steps:
$Vnet1ResourceGroupName = “VNet1 Resource Group Name”
$Vnet2ResourceGroupName = “VNet2 Resource Group Name”
$Vnet1Name = “VNet1 Name”
$Vnet2Name = “VNet2 Name”
$Vnet1 = Get-AzVirtualNetwork -Name $Vnet1Name -ResourceGroupName $Vnet1ResourceGroupName
$Vnet2 = Get-AzVirtualNetwork -Name $Vnet2Name -ResourceGroupName $Vnet2ResourceGroupName
Add-AzVirtualNetworkPeering `
-Name “VNet1toVNet2” `
-VirtualNetwork $Vnet1 `
-RemoteVirtualNetworkId $Vnet2.Id `
-AllowForwardedTraffic `
-AllowGatewayTransit `
-UseRemoteGateways
Get-AzVirtualNetworkPeering `
-Name “VNet1toVNet2” `
-VirtualNetwork $Vnet1 `
-ResourceGroupName $Vnet1ResourceGroupName
Creating Vnet Peering Conection in Azure Portal Within Vnets with Terraform.
provider “azurerm” {
features {}
}
resource “azurerm_resource_group” “vnet1_rg” {
name = “vnet1-rg”
location = “eastus”
}
resource “azurerm_resource_group” “vnet2_rg” {
name = “vnet2-rg”
location = “eastus2”
}
resource “azurerm_virtual_network” “vnet1” {
name = “vnet1”
address_space = [“10.0.0.0/16”]
location = azurerm_resource_group.vnet1_rg.location
resource_group_name = azurerm_resource_group.vnet1_rg.name
}
resource “azurerm_virtual_network” “vnet2” {
name = “vnet2”
address_space = [“10.1.0.0/16”]
location = azurerm_resource_group.vnet2_rg.location
resource_group_name = azurerm_resource_group.vnet2_rg.name
}
resource “azurerm_subnet” “vnet1_subnet” {
name = “vnet1-subnet”
resource_group_name = azurerm_resource_group.vnet1_rg.name
virtual_network_name = azurerm_virtual_network.vnet1.name
address_prefixes = [“10.0.1.0/24”]
}
resource “azurerm_subnet” “vnet2_subnet” {
name = “vnet2-subnet”
resource_group_name = azurerm_resource_group.vnet2_rg.name
virtual_network_name = azurerm_virtual_network.vnet2.name
address_prefixes = [“10.1.1.0/24”]
}
resource “azurerm_virtual_network_peering” “vnet1_to_vnet2” {
name = “vnet1-to-vnet2”
resource_group_name = azurerm_resource_group.vnet1_rg.name
virtual_network_name = azurerm_virtual_network.vnet1.name
remote_virtual_network_id = azurerm_virtual_network.vnet2.id
allow_virtual_network_access = true
allow_forwarded_traffic = true
# Optional: Configure traffic forwarding from vnet2 to vnet1
allow_gateway_transit = true
}
resource “azurerm_virtual_network_peering” “vnet2_to_vnet1” {
name = “vnet2-to-vnet1”
resource_group_name = azurerm_resource_group.vnet2_rg.name
virtual_network_name = azurerm_virtual_network.vnet2.name
remote_virtual_network_id = azurerm_virtual_network.vnet1.id
allow_virtual_network_access = true
allow_forwarded_traffic = true
# Optional: Configure traffic forwarding from vnet1 to vnet2
allow_gateway_transit = true
}
